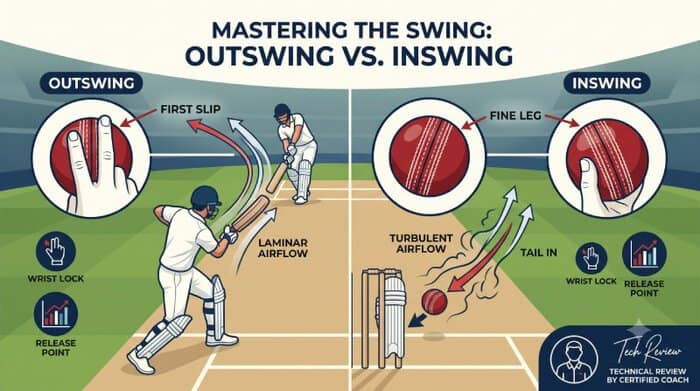
Mastering the art of moving a cricket ball in the air is what separates standard medium-pacers from match-winning opening bowlers. Whether your goal is finding the outside edge of an opener’s bat or shattering the stumps through the gate, learning conventional swing requires an exact understanding of aerodynamics, wrist geometry, and release points.
Just as batters must eliminate common batting mistakes to survive at the crease, a fast bowler must master seam presentation to dictate terms.
The Aerodynamics: How Swing Actually Works
Conventional swing relies on aerodynamic turbulence and the lateral pressure differential created by the raised primary seam on a new leather ball.
At bowling speeds between 120 km/h and 140 km/h:
- The Smooth Side: Air flows cleanly over the polished hemisphere of the ball, maintaining a laminar boundary layer that separates earlier.
- The Seam Side: The raised primary seam trips the airflow passing over it, converting it into a turbulent boundary layer. Turbulent air sticks to the curvature of the ball longer before detaching.
- The Lateral Force: Because air stays attached longer on the seam side, it creates a region of lower relative pressure. The ball naturally swings toward the direction where the seam is angled.
Part 1: How to Bowl the Outswinger
The outswinger starts on a middle-and-off line and shapes away toward the slips, targeting the outside edge or drawing the batter into a loose drive outside the off-stump.
1. The Grip and Finger Placement
- Place your index and middle fingers directly on top of the seam, separated by roughly a centimeter.
- Anchor your thumb directly along the bottom seam for firm support, rather than letting it slide off to the side.
- Cock your wrist slightly toward first slip (roughly the 11 o’clock position for a right-arm bowler).
- Keep the wrist locked and upright throughout your delivery stride. A collapsing wrist causes the seam to wobble and kills lateral deviation.
2. Body Alignment and Delivery Stride
- A side-on action naturally promotes late outswing. During your back-foot landing, align your shoulders and hips in a direct line pointing toward the off-stump.
- Ensure your bowling boots provide adequate ankle and heel stability through the crease; wearing the right cricket shoes for fast bowlers prevents your plant foot from slipping during maximum impact.
- Your bowling arm should brush past your ear at release, ensuring a high, vertical release point.
- Direct your momentum through the off-side cordon during your follow-through.
3. The Release and Backspin
- As the ball exits the hand, pull your index and middle fingers directly down the back of the seam.
- Impart clean, upright backspin. In the air, the seam should look like a rotating bicycle wheel angled steadily toward the slip cordon.
Match Study – James Anderson: James Anderson remains the gold standard of outswing bowling because his wrist position does not buckle upon release. By keeping the seam bolt-upright and angled toward third slip, he creates late, unplayable movement 2 to 3 meters before the batter plays the shot.
Part 2: How to Bowl the Inswinger
The inswinger attacks the stumps, angling in toward the pads or whistling through the gap between bat and pad to clean up the stumps or trap the batter leg-before-wicket (LBW).
1. The Grip and Finger Placement
- Keep your index and middle fingers slightly closer together along the seam than you do for outswing.
- Rest your thumb slightly on the outer quadrant of the ball rather than dead center along the bottom seam.
- Angle the wrist slightly toward fine leg or backward square leg (roughly the 1 o’clock position for a right-arm bowler).
2. Body Alignment and Delivery Stride
- A front-on or semi-open action is ideal for generating sharp inswing.
- Pull your non-bowling arm down firmly against your chest to help rotate your bowling shoulder squarely through the crease.
- Follow through diagonally across your body, driving your bowling arm toward your opposite hip (left hip for a right-arm bowler).
3. The Release Dynamics
- Apply slightly more forward rolling pressure with your middle finger as the ball leaves your fingertips.
- This pressure, paired with the diagonal seam angle pointing toward leg slip, forces the ball to drift and tail back into the batter’s pads.
Match Study – Bhuvneshwar Kumar: Bhuvneshwar uses an open-chested delivery position to deliver his trademark inswinger. By driving his right shoulder squarely toward the batter’s front pad and finishing tight to his left hip, he attacks the stumps with late inward bend.
Outswing vs. Inswing: Technical Breakdown
| Feature | Outswing Delivery | Inswing Delivery |
| Seam Angle | Tilted toward 1st / 2nd Slip | Tilted toward Fine Leg / Leg Slip |
| Primary Target | Corridor of Uncertainty (Outside Off) | Stumps, Front Pad, Gap Between Bat & Pad |
| Preferred Action | Side-on / Semi-side-on | Front-on / Semi-open |
| Follow-Through | Straight toward off-side target | Across the body toward the opposite hip |
| Typical Mode of Dismissal | Caught Behind / Slips | Bowled / LBW |
3 Common Swing Mistakes and How to Correct Them
- Wobbling Seam in Flight: If the ball wobbles rather than spinning clean, your wrist is collapsing backward during release. The Fix: Practice stationary flick drills into a net from 2 yards away, focusing strictly on rolling the fingers through the seam with a stiff wrist.
- Telegraphing the Delivery via Run-up: Bowlers often run wider on the crease when attempting to bowl inswing. High-level batters will spot this angle change instantly, just as skilled spinners use deception and calculated field placements for spin bowling to manipulate shot selection. Keep your run-up lane consistent; generate movement through wrist alignment and finger release, not extreme running angles.
- Dropping the Bowling Arm: Releasing the ball with a low, round-arm sling often flattens out conventional swing. Keep the front arm elevated as high as possible before pulling down into your delivery stride.
Practical Practice Drill: The Two-Tone Ball Drill
To master conventional swing, take a two-colored practice ball (half white, half red) or draw a thick black marker line through the center of a tennis ball.
Stand 10 yards away from a teammate or coaching net. Practice releasing the ball off 2 to 3 paces:
- If the colors blend into a clean, divided spin without flickering, your seam presentation is stable.
- If the colors flutter, your release is unstable and requires immediate wrist-locking corrections.
Equipping players with proper leather training equipment is essential for developing real seam control, check out our breakdown of the best cricket kit for beginners to find match-grade balls and practice gear.

Leave a Reply